shader初尝试 | 给石头覆盖一层雪景(Hello World)
给石头覆盖一层雪景
资源准备
- 石头模型
- Unity2021.2.3f1c1
- Mac & Windows
在Unity中创建一个项目,导入石头模型,下面就开始利用shader给石头做一个雪景覆盖.
实现效果
开始代码
我在代码中标注了1,2,3,4,5
代码
// Upgrade NOTE: replaced '_Object2World' with 'unity_ObjectToWorld'

Shader "Custom/Diffuse Texture"
{
    Properties
    {
        _Color ("Color", Color) = (1,1,1,1)
        _MainTex ("Albedo (RGB)", 2D) = "white" {}
        _Glossiness ("Smoothness", Range(0,1)) = 0.5
        _Metallic ("Metallic", Range(0,1)) = 0.0

        //1
        _Bump("Bump", 2D) = "bump" {}
        _Snow ("Snow Level", Range(0, 1)) = 0.1
        _SnowColor ("Snow Color", Color) = (1.0, 1.0, 1.0, 1.0)
        _SnowDirection ("Snow Direction", Vector) = (0, 1, 0)
        _SnowDepth ("Snow Depth", Range(0, 0.3)) = 0.1
    }
    SubShader
    {
        Tags { "RenderType"="Opaque" }
        LOD 200

        CGPROGRAM
        // Physically based Standard lighting model, and enable shadows on all light types
        #pragma surface surf CustomDiffuse vertex:vert

        // Use shader model 3.0 target, to get nicer looking lighting
        #pragma target 3.0

        sampler2D _MainTex;

        //2
        sampler2D _Bump;
        float _Snow;
        float4 _SnowColor;
        float4 _SnowDirection;
        float _SnowDepth;

        struct Input
        {
            float2 uv_MainTex;

            //3
            float2 uv_Bump;
            float3 worldNormal; INTERNAL_DATA
        };

        half _Glossiness;
        half _Metallic;
        fixed4 _Color;

        // Add instancing support for this shader. You need to check 'Enable Instancing' on materials that use the shader.
        // See https://docs.unity3d.com/Manual/GPUInstancing.html for more information about instancing.
        // #pragma instancing_options assumeuniformscaling
        UNITY_INSTANCING_BUFFER_START(Props)
            // put more per-instance properties here
        UNITY_INSTANCING_BUFFER_END(Props)

        void surf (Input IN, inout SurfaceOutput o)
        {
            // Albedo comes from a texture tinted by color
            fixed4 c = tex2D (_MainTex, IN.uv_MainTex) * _Color;
            //4
            o.Normal = UnpackNormal(tex2D(_Bump, IN.uv_Bump));
            if (dot(WorldNormalVector(IN, o.Normal), _SnowDirection.xyz) > lerp(1, -1, _Snow))
            {
                o.Albedo = _SnowColor.rgb;
            }
            else
            {
                o.Albedo = c.rgb;
            }

            o.Alpha = c.a;
        }

        inline float4 LightingCustomDiffuse (SurfaceOutput s, fixed3 lightDir, fixed atten)
        {
            float difLight = dot(s.Normal, lightDir);
            float hLambert = difLight * 0.5 + 0.5;

            float4 col;
            col.rgb = s.Albedo * _LightColor0.rgb * (difLight * atten * 2);
            col.a = s.Alpha;
            return col;
        }

        //5
        void vert(inout appdata_full v)
        {
            float4 sn = mul(transpose(unity_ObjectToWorld), _SnowDirection);
            if (dot(v.normal, sn.xyz) >= lerp(1, -1, (_Snow * 2)/ 3))
            {
                v.vertex.xyz += (sn.xyz + v.normal) * _SnowDepth * _Snow;
            }
        }
        ENDCG
    }
    FallBack "Diffuse"
}
声明并加入一个显示名称为Bump的贴图,用于放置法线图
为了能够在CG程序中使用这张贴图,必须加入一个sample,希望你还记得~
获取Bump的uv信息作为输入
从法线图中提取法线信息,并将其赋予相应点的输出的Normal属性。UnpackNormal是定义在UnityCG.cginc文件中的方法,这个文件中包含了一系列常用的CG变量以及方法。UnpackNormal接受一个fixed4的输入,并将其转换为所对应的法线值(fixed3)。在解包得到这个值之后,将其赋给输出的Normal,就可以参与到光线运算中完成接下来的渲染工作了。
更改顶点模型。
- #pragma surface surf CustomDiffuse vertex:vert
- 对应的函数是
void vert(inout appdata_full v)
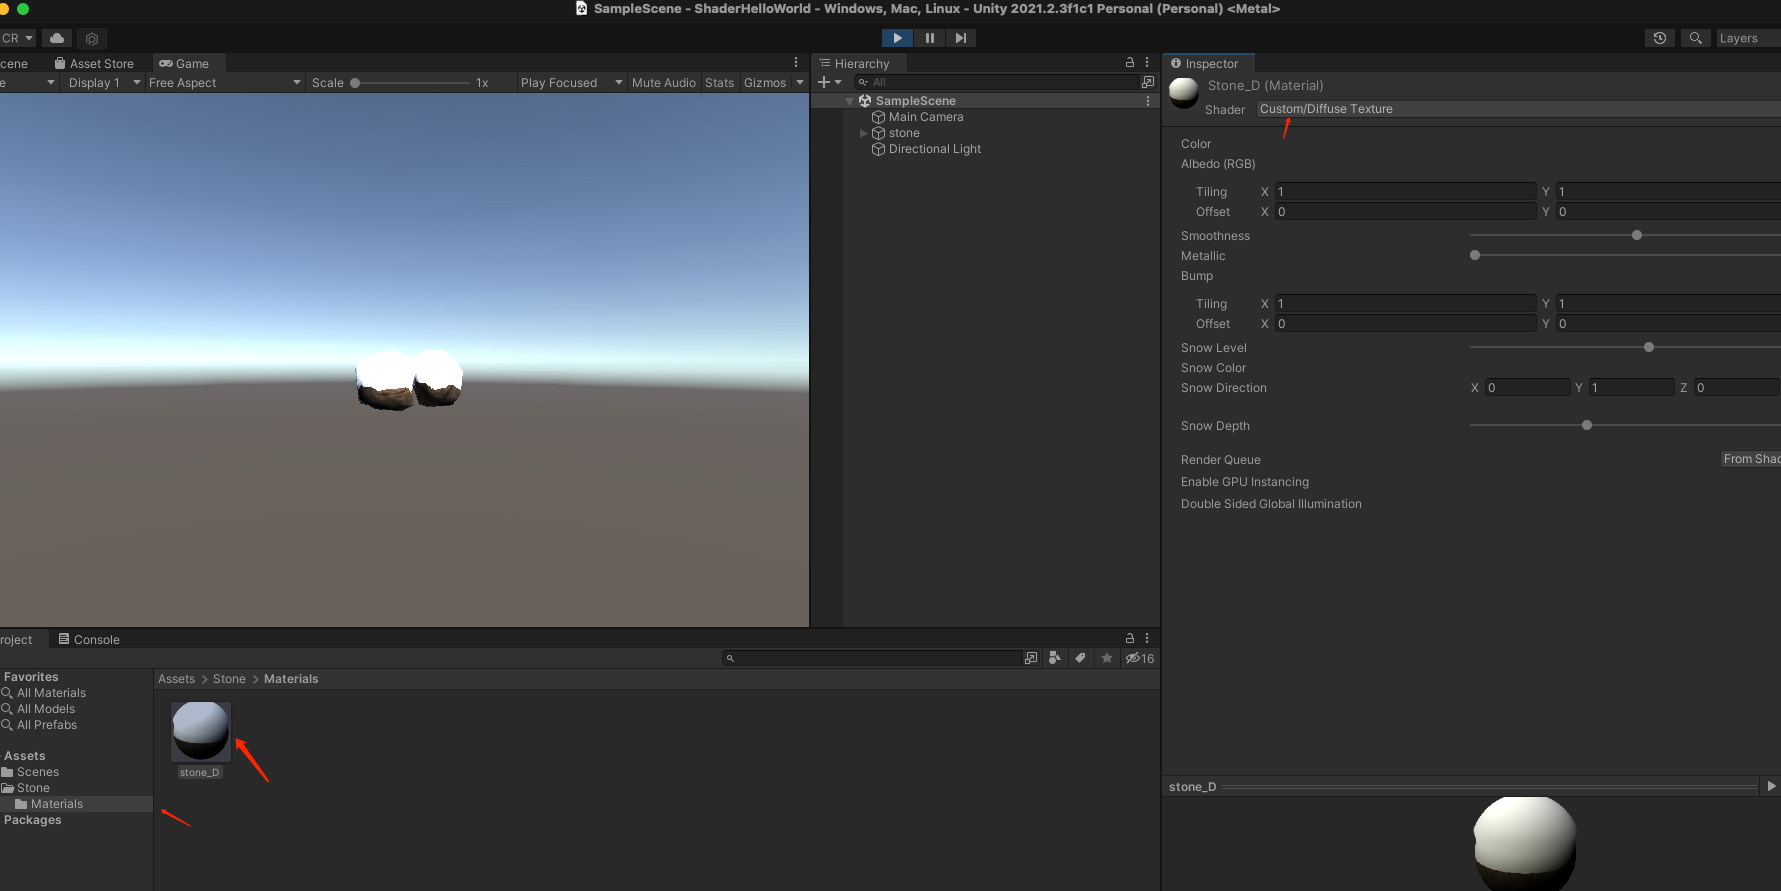
关联材质与自己写的shader,作为初学者,我一度找不到关联材质与shader的地方, 下图是我做的笔记,方便后来人快速找到关联地:

总结
跟着教程走完整个流程, 当调整Snow Level这个参数的大小,石头上的雪景也跟着变换时,心里是非常有成就感的,这就是shader的魅力,感谢作者提供的教程。 下面我准备系统性的学习shader + 计算机图形学,从《Unity Shader入门精要》开始
到时候再回过头来看看这篇笔记中我不理解的点。比如光照模型、shader的编程语法问题和顶点着色器和表面着色器的区别。
学习参考
--完--
- 原文作者: 留白
- 原文链接: https://zfunnily.github.io/2022/04/shaderhelloworld/
- 更新时间:2024-04-16 01:01:05
- 本文声明:转载请标记原文作者及链接

