URP 不透明/半透明物体的折射
折射
应用场景
- 水池
- 玻璃
- 热空气(热扭曲)
GrabPass + CubeMap
《Unity3D Shader入门精要》第十章介绍了,模拟实现折射效果有两种
- 使用cubemap: 我认为太麻烦.需要的贴图太多。也没有找到其他合适的使用场景,遂搁置。
- 使用GrabPass抓屏: 是一种比较简单也好理解的方式,抓屏,然后对抓到的贴图的坐标进行偏移。
详情可以参考 《Unity3D Shader入门精要》第十章
URP 下的热扭曲(Opaque)
按照以往的把build-in升级到urp渲染管线,只需要改改Tag、变量名字和类型。 谁知道程序一直报错。
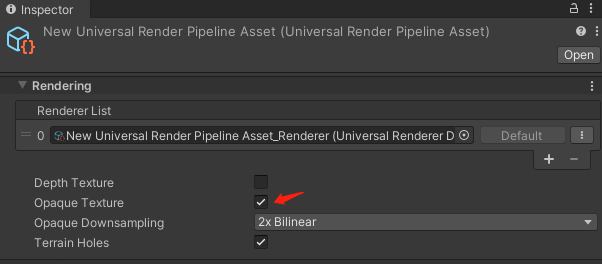
URP摒弃了GrabPass, 找到了可以使用 _CameraOpaqueTexture 来获取不透明物体的绘制。
有了如下代码:
代码
Shader "URP/DistortionOpaque"
{
	Properties {
		_NoiseTex ("Noise Texture (RG)", 2D) = "white" {}
		_HeatTime  ("Heat Time", range (0,1)) = 0.1
		_HeatForce  ("Heat Force", range (0,0.1)) = 0.008
	}

	SubShader {
		Tags { "Queue" = "Transparent" "RenderType" = "Transparent" "RenderPipeline"="UniversalPipeline"}
		Blend SrcAlpha OneMinusSrcAlpha
		//AlphaTest Greater .01
		Cull Off
		Lighting Off
		//ZTest Off
		ZWrite Off
		Pass {
			Tags { "LightMode" = "UniversalForward"}

			HLSLPROGRAM
				#pragma vertex vert
				#pragma fragment frag
				#pragma fragmentoption ARB_precision_hint_fastest

				#include "Packages/com.unity.render-pipelines.universal/ShaderLibrary/Core.hlsl"
				#include "Packages/com.unity.render-pipelines.universal/ShaderLibrary/Lighting.hlsl"

				struct appdata_t {
					float4 vertex : POSITION;
					float4 color : COLOR;
					float2 texcoord: TEXCOORD0;
				};

				struct v2f {
					float4 vertex : POSITION;
					float4 uvgrab : TEXCOORD0;
					float2 uvmain : TEXCOORD1;
				};

				float _HeatForce;
				float _HeatTime;
				float4 _NoiseTex_ST;
				sampler2D _NoiseTex;
				SAMPLER(_CameraOpaqueTexture);

				v2f vert (appdata_t v)
				{
					v2f o;
					VertexPositionInputs vertexInput = GetVertexPositionInputs(v.vertex.xyz);
					o.vertex = vertexInput.positionCS;

					#if UNITY_UV_STARTS_AT_TOP
					float scale = -1.0;
					#else
					float scale = 1.0;
					#endif

					o.uvmain = TRANSFORM_TEX( v.texcoord, _NoiseTex);
					return o;
				}

				half4 frag( v2f i ) : SV_Target
				{
					//noise effect
					half4 offsetColor1 = tex2D(_NoiseTex, i.uvmain + _Time.xz*_HeatTime);
					half4 offsetColor2 = tex2D(_NoiseTex, i.uvmain - _Time.yx*_HeatTime);
					half distortX = ((offsetColor1.r + offsetColor2.r) - 1) * _HeatForce;
					half distorty = ((offsetColor1.g + offsetColor2.g) - 1) * _HeatForce;

					half2 screenUV = (i.vertex.xy / _ScreenParams.xy)+ float2(distortX, distorty);

					half4 col = tex2D(_CameraOpaqueTexture, screenUV);
					col.a = 1.0f;

					return col;
				}
			ENDHLSL
		}
	}
}
URP 下的热扭曲(Sprite)
- _CameraColorTexture 是场景渲染后生成的纹理截图,
- _CameraOpaqueTexture 是在不透明物体渲染后截图,所以截取不到透明物体。
上面的方法是不支持半透明物体的,但是我现在有个需求是需要支持 Sprite, Sprite是作为一个半透明物体,无法使用上面的方法。
网上解决抓取半透明物体的方法是使用 _AfterPostProcessTexture。 思路如下:
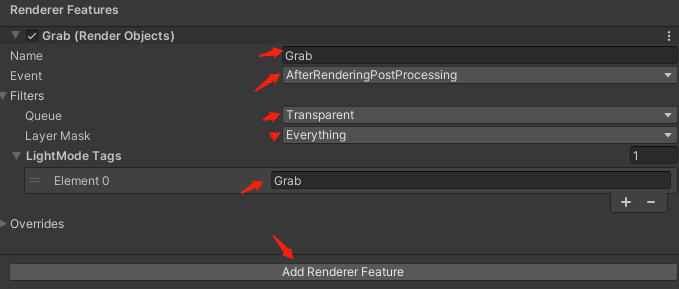
- 利用RendererFeatures新建一个渲染时机 ,并新建一种LightMode Tags = Grab的类型.
- 这样所有Tags是Grab的shader都会在后期处理完成之后在渲染。
设置管线
- Name: Render Object 名字
- Event: AfterRenderingPostProcessing 获取屏幕渲染出的一张图
- Queue & Layer Mask: 设置渲染所有层和叠加模式
- LightMode Tags: 设置标签
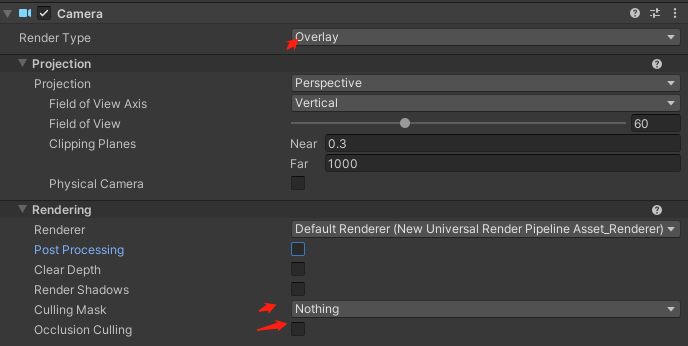
设置相机
- 勾选 Post Processing
- Stack添加子相机
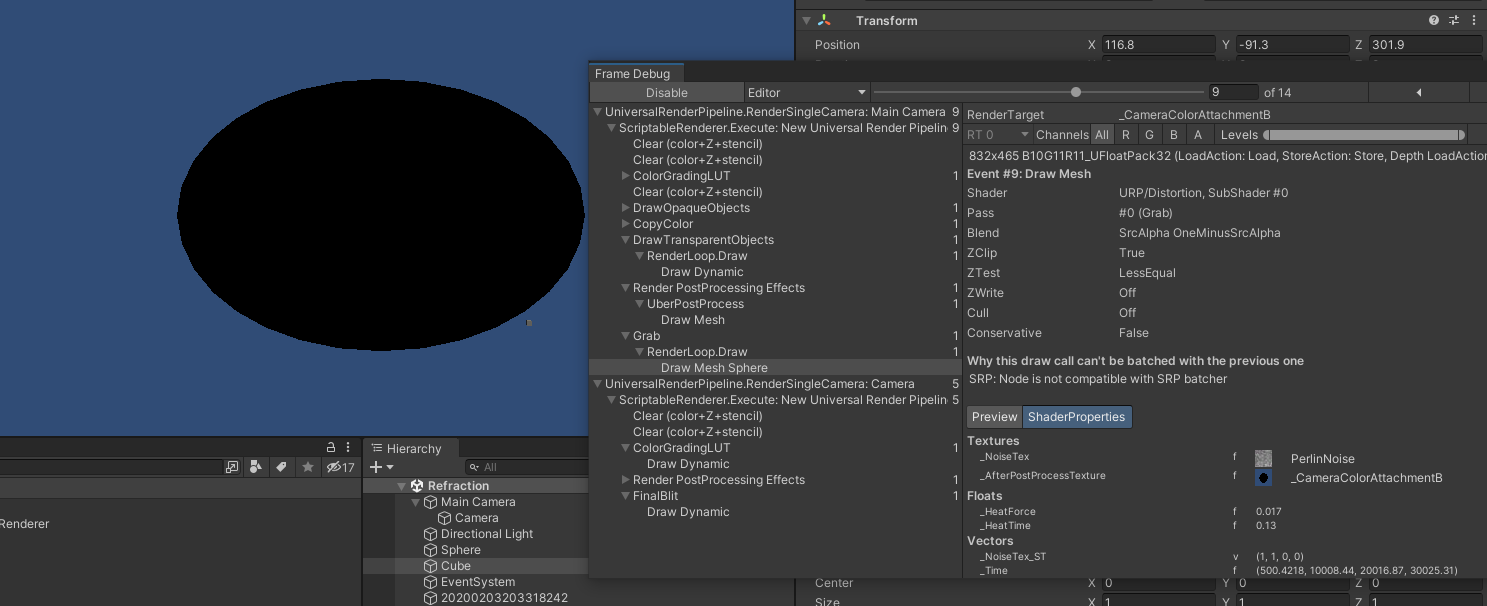
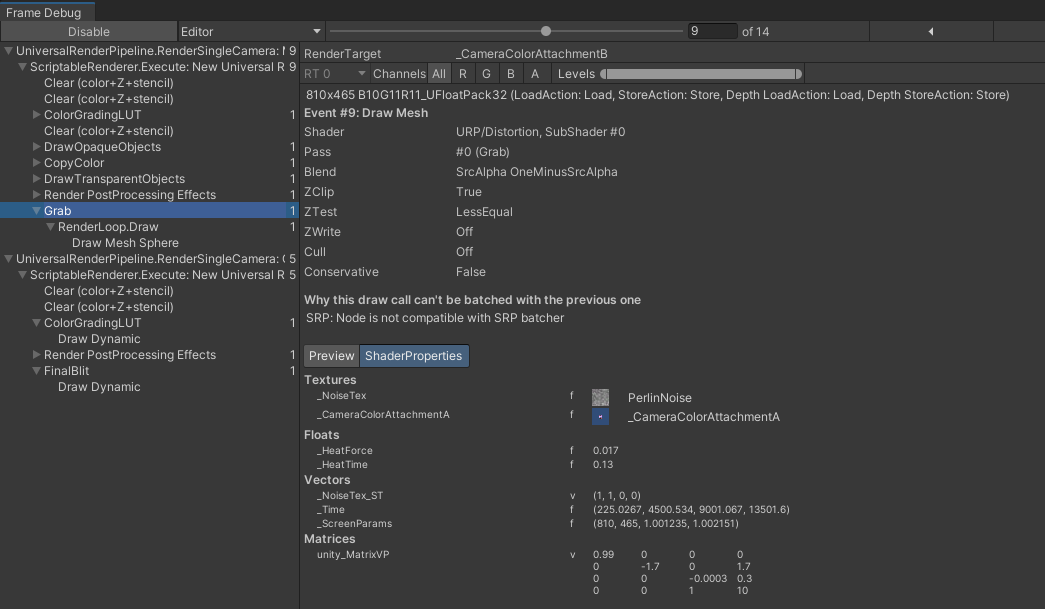
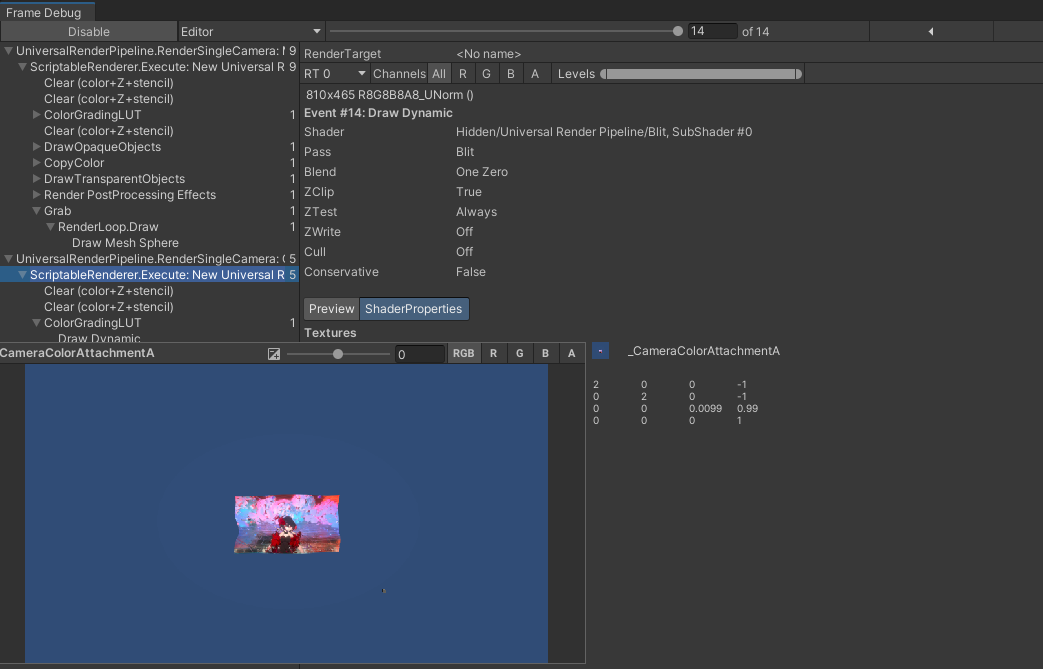
在FrameDebug里我们可以看到俩个摄像机,第二个摄像机就是看到前面渲染效果
设置shader
复制上文中的shader, 然后修改贴图
SAMPLER(_AfterPostProcessTexture);
修改获取贴图纹理
half4 col = tex2D(_AfterPostProcessTexture, screenUV);
在Fram Debugger 中, Grab渲染层级下并没有参数 _AfterPostProcessTexture. 反而看到的是 _CameraColorAttachmentA,
在shader代码中相应的位置修改成后_CameraColorAttachmentA,发现能正常显示了。
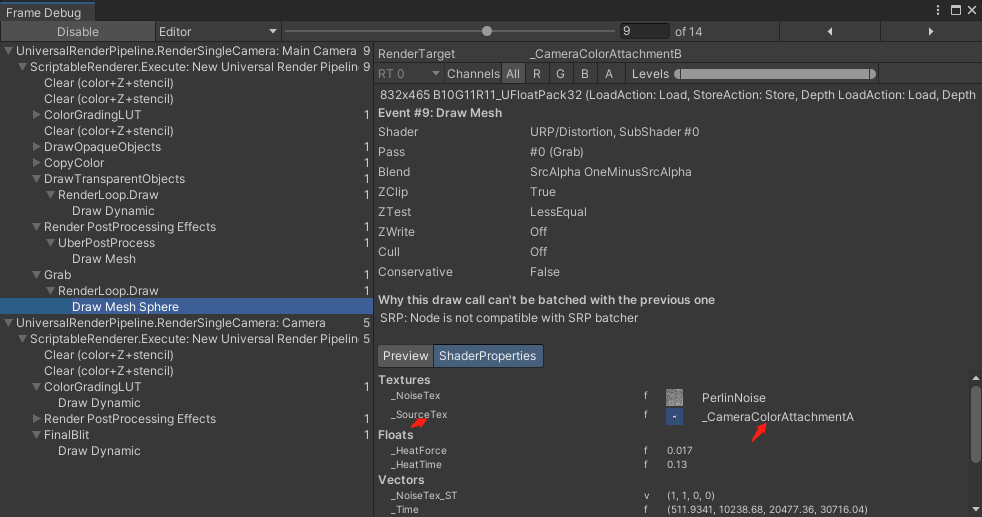
- 我看到修改成_SourceTex和_CameraColorAttachmentA都能正常显示。
完整代码如下:
代码
Shader "URP/Distortion"
{
	Properties {
		_NoiseTex ("Noise Texture (RG)", 2D) = "white" {}
		_HeatTime  ("Heat Time", range (0,1)) = 0.1
		_HeatForce  ("Heat Force", range (0,0.1)) = 0.008
	}

	SubShader {
		Tags { "Queue" = "Transparent" "RenderType" = "Transparent" "RenderPipeline"="UniversalPipeline"}
		Blend SrcAlpha OneMinusSrcAlpha
		//AlphaTest Greater .01
		Cull Off
		//Lighting Off
		//ZTest Off
		ZWrite Off
		Pass {
			//Tags { "LightMode" = "UniversalForward"}
			Tags { "LightMode" = "Grab"}

			HLSLPROGRAM
				#pragma vertex vert
				#pragma fragment frag
				#pragma fragmentoption ARB_precision_hint_fastest

				#include "Packages/com.unity.render-pipelines.universal/ShaderLibrary/Core.hlsl"
				#include "Packages/com.unity.render-pipelines.universal/ShaderLibrary/Lighting.hlsl"

				struct appdata_t {
					float4 vertex : POSITION;
					float4 color : COLOR;
					float2 texcoord: TEXCOORD0;
				};

				struct v2f {
					float4 vertex : POSITION;
					float4 uvgrab : TEXCOORD0;
					float2 uvmain : TEXCOORD1;
				};

				float _HeatForce;
				float _HeatTime;
				float4 _NoiseTex_ST;
				sampler2D _NoiseTex;
				//SAMPLER(_CameraOpaqueTexture);
				//SAMPLER(_AfterPostProcessTexture);
				//SAMPLER(_CameraColorTexture);
				//SAMPLER(_CameraColorAttachmentA);
				SAMPLER(_SourceTex);

				v2f vert (appdata_t v)
				{
					v2f o;
					VertexPositionInputs vertexInput = GetVertexPositionInputs(v.vertex.xyz);
					o.vertex = vertexInput.positionCS;

					#if UNITY_UV_STARTS_AT_TOP
					float scale = -1.0;
					#else
					float scale = 1.0;
					#endif

					o.uvmain = TRANSFORM_TEX( v.texcoord, _NoiseTex);
					return o;
				}

				half4 frag( v2f i ) : SV_Target
				{
					//noise effect
					half4 offsetColor1 = tex2D(_NoiseTex, i.uvmain + _Time.xz*_HeatTime);
					half4 offsetColor2 = tex2D(_NoiseTex, i.uvmain - _Time.yx*_HeatTime);
					half distortX = ((offsetColor1.r + offsetColor2.r) - 1) * _HeatForce;
					half distorty = ((offsetColor1.g + offsetColor2.g) - 1) * _HeatForce;

					half2 screenUV = (i.vertex.xy / _ScreenParams.xy)+ float2(distortX, distorty);

					half4 col = tex2D(_SourceTex, screenUV);
					col.a = 1.0f;

					return col;
				}
			ENDHLSL
		}
	}
}
参考
- 《U3D shader 入门精要》 10 章
- 不透明物体的热扭曲: https://www.bilibili.com/read/cv15512651
- 透明物体的热扭曲: https://zhuanlan.zhihu.com/p/364021217
- 扭曲效果: https://www.bilibili.com/read/cv15512651
- _CameraOpaqueTexture does not render any URP sprite: https://forum.unity.com/threads/scene-color-shadergraph-node-_cameraopaquetexture-with-urp-2d-lighting.757985/
--完--
- 原文作者: 留白
- 原文链接: https://zfunnily.github.io/2022/05/refraction/
- 更新时间:2024-04-16 01:01:05
- 本文声明:转载请标记原文作者及链接
