Gitlab | CI/CD简单实现
CI/CD 流水线 组件组成
- stages
- job
- gitlab runner(可以与gitlab服务器独立, c/s架构. )
--------    --------    ---------
|stage1| -> |stage2| -> | stage3|
--------    --------    ---------

------    ------    -------
|job1|    |job2|    | job3|
------    ------    -------

---------   ---------    ---------
|runner1|   |runner2| -> |runner3|
---------   ---------    ---------
- pipline: 包含多个stage, 顺序执行
- stages: 一个stage可以包含多个job,job之间并行
- jobs: 一个job对应一个runner
- runner: job的运行环境 可以独立于gitlab,放到其他宿主机上.
gitlab runner 安装
gitlab runner是运行job的环境。需要安装一个可以执行gitlab runner命令的环境.
docker runner安装
https://docs.gitlab.com/runner/install/docker.html
$ docker volume create gitlab-runner-config
$ docker run -d --name gitlab-runner --restart always \
    -v /var/run/docker.sock:/var/run/docker.sock \
    -v gitlab-runner-config:/etc/gitlab-runner \
    gitlab/gitlab-runner:latest
docker runner 编译镜像
有两种方式去编译镜像
- 挂载 /var/run/docker.sock,使用比较简单,直接使用 share docker daemon 的方式,共享缓存也简单,能够加快编译速度;缺点是有权限问题,因为在 ci 里面完全可以执行 docker rm -f $(docker ps -a -q) 这样危险的命令;
- Docker in docker & Privileged mode,也就是在 docker container 里面编译镜像,没有了权限问题的担忧,编译镜像互相隔离;缺点么,就是无法共享缓存,从而导致编译速度会变慢,因此在 docker:dind 中建议使用 overlay fs driver 以及本地的一些镜像缓存来加快速度;
因为跟线上环境是隔离的, runner是独立于gitlab服务的一台内网机机器,如果runner 所在的宿主机宕机了或者docker损坏,我也可以通过docker快速部署一台我需要的docker runner. 所以我选择的是第一种.
其他安装方式
注册runner命令
汇总操作命令 (推荐)
$ docker exec -it gitlab-runner  gitlab-runner register -n \
  --executor docker \
  --docker-image "docker:latest" \
  --url "https://gitlab.com" \
  --registration-token "GR1348941pvMxbpQFn2" \
  --description "Docker" \
  --tag-list "docker,pro2dserver" \
  --docker-privileged=true \
  --docker-pull-policy="if-not-present" \
  --locked="false" \
  --docker-volumes /var/run/docker.sock:/var/run/docker.sock
- executor: 执行器,有docker,shell,ssh…
- docker-image: 指定runner使用的docker镜像
- url: 指定gitlab服务地址
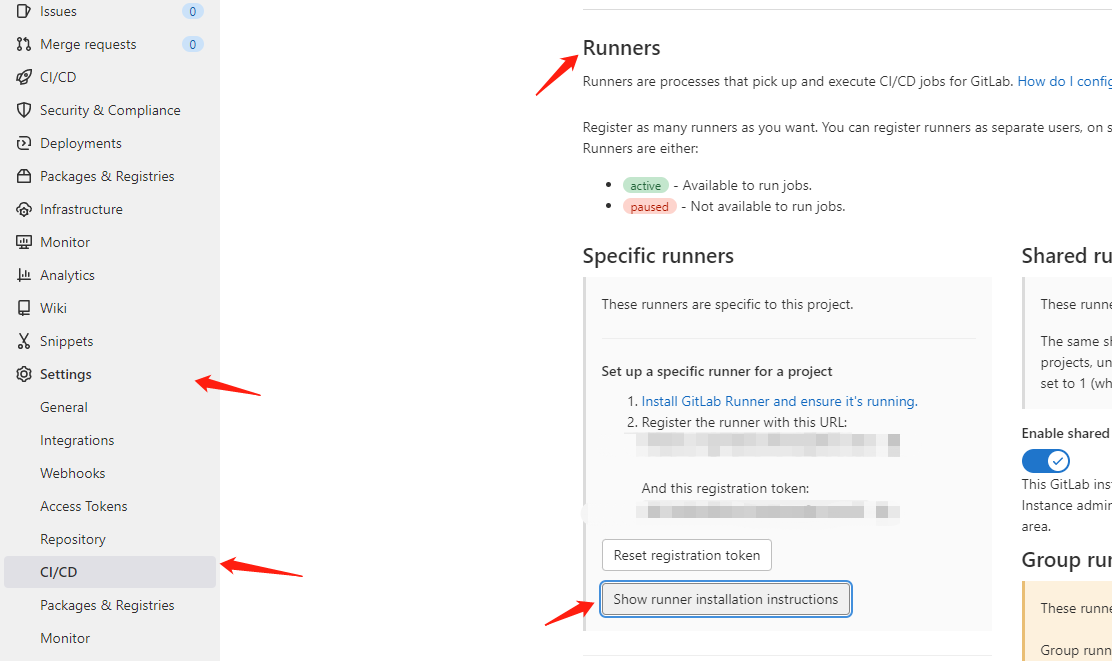
- registration-token: 项目的runner token, 可以在setting->CI/CD->Runner 中找到
- tag-list: 配置流水管线的job任务时,可以通过指定tag,来使用与之相同tag的runner
- pull-policy: 使用缓存, 提升速度
- docker-volumes: 使用宿主机的docker
分步操作
代码
# 进入容器
docker exec -it gitlab-runner /bin/bash

# 运行以下注册命令
gitlab-runner register

# 输入Gitlab实例的地址
Please enter the gitlab-ci coordinator URL (e.g. https://gitlab.com )
https://gitlab.com  # 端口采用默认的80,否则需要加上端口

# 输入token
Please enter the gitlab-ci token for this runner
GR1348941pvMxbpQFn2

# 输入Runner的描述,后期可以手动修改
Please enter the gitlab-ci description for this runner
[hostname] my-runner

# 输入与Runner关联的标签,后期可以手动修改
Please enter the gitlab-ci tags for this runner (comma separated):
my-tag

# 输入Ruuner的执行者
Please enter the executor: ssh, docker+machine, docker-ssh+machine, kubernetes, docker, parallels, virtualbox, docker-ssh, shell:
docker

# 如果上面执行者为docker,需要你在后续项目根部的.gitlab-ci.yml中指定docker版本
Please enter the Docker image (eg. ruby:2.1):
alpine:latest
runner注册完毕之后,还需要修改一下runner的配置文件,实现runner与宿主机的数据挂载:
代码
$ vim /etc/gitlab-runner/config/config.toml # 开头创建的宿主机挂载目录

concurrent = 1
check_interval = 0

[session_server]
  session_timeout = 1800

[[runners]]
  name = "my-runner"
  url = "http://192.168.0.253"
  token = "tyXBwC8frbShS4yn3nE5"
  executor = "docker"
  [runners.custom_build_dir]
  [runners.cache]
    [runners.cache.s3]
    [runners.cache.gcs]
    [runners.cache.azure]
  [runners.docker]
    tls_verify = false
    image = "alpine:latest"
    privileged = false
    disable_entrypoint_overwrite = false
    oom_kill_disable = false
    disable_cache = false
    volumes = ["/cache","/var/run/docker.sock:/var/run/docker.sock"]
    shm_size = 0
原先是volumes = ["/cache"] 上面的volumes数组中添加docker的挂载,加快项目的构建速度。
最后,只需要再重启runner容器即可:
docker restart gitlab-runner
说明: 1.不同的项目可以使用不同的gitlab-runner,根据实际情况再运行一个名称不一样的容器,并根据新项目的token注册就行了。 2.不同的项目还可以使用同一个gitlab-runner,只需要在注册的时候使用不同项目下的token就行了。
简单实现CI/CD
以需求为导向, 实现三个阶段build, test, deploy。
- 注册一个docker执行器的runner, 给build-job使用
$ docker exec -it gitlab-runner  gitlab-runner register -n \
  --executor docker \
  --docker-image "docker:latest" \
  --url "https://gitlab.com" \
  --registration-token "ZazPwxyyB" \
  --description "Docker" \
  --tag-list "docker" \
  --docker-privileged=true \
  --docker-pull-policy="if-not-present" \
  --locked="false" \
  --docker-volumes /var/run/docker.sock:/var/run/docker.sock
- 注册一个shell执行器的runner , 给deploy-job使用
$ docker exec -it gitlab-runner  gitlab-runner register -n \
  --executor shell \
  --url "https://gitlab.com" \
  --registration-token "ZazPwxyyB" \
  --description "Shell" \
  --tag-list "shell" \
  --locked="false"
- 在项目根目录创建文件
.gitlab-ci.yml, 写入一下内容,提交服务器,即可以看到CI/CD流水线中已经开始运行
stages:          # List of stages for jobs, and their order of execution
  - build
  - test
  - deploy

build-job:       # This job runs in the build stage, which runs first.
  stage: build
  script:
    - echo "Compiling the code..."
    - echo "Compile complete."
  only:
    - master
  tags:
    - docker

unit-test-job:   # This job runs in the test stage.
  stage: test    # It only starts when the job in the build stage completes successfully.
  script:
    - echo "Running unit tests... This will take about 60 seconds."
    - echo "Code coverage is 90%"
  only:
    - master
  tags:
    - shell

deploy-job:      # This job runs in the deploy stage.
  stage: deploy  # It only runs when *both* jobs in the test stage complete successfully.
  script:
    - echo "Deploying application..."
    - echo "Application successfully deployed."
  only:
    - master
  tags:
    - shell
- only: 指定项目分支或者tags, 当有某个分支有新内容提交或者有个新tag提交上来时可以触发该job
- tags: 指定runner的tag,job运行在与之匹配的tags的runner环境中。
Executor(执行器)
参考: https://docs.gitlab.com/runner/executors/
- Shell: 简单来说,就是在一台机器上配置好所有的环境,然后给job使用。
- Docker:最简单,从 Shell 迁移来说,工作量不大;
- Docker Machine & Docker Machine SSH:需要多台机器,配置复杂;
- Parallels OR VirtualBox:虚拟机,太重量级了;
- SSH:与 Shell 一个意思,换成远程执行 Shell 命令;
- Kubernetes:有点复杂,目前团队 k8s 仍处于引入阶段,暂时不考虑;
如果使用的是shell执行器(Executor), 如果要免密操作需要如下步骤
生成密钥
ssh-keygen
ssh-copy-id -i ~/.ssh/id_rsa.pub user@host
测试免密登录
ssh user@host
因为是docker拉起来的gitlab-runner, 免密操作可能会出现
scp code/*.sh root@11.22.33.55:/root/
Host key verification failed.
解决方案: 需要在gitlab-settings-variables下设置变量SSH_PRIVATE_KEY,value为~/.ssh/id_rsa的内容,
-----BEGIN RSA PRIVATE KEY-----
...
-----END RSA PRIVATE KEY-----
添加到value中.
需要更新.gitlab-ci.yml文件,在before_script步骤内添加以下内容
  before_script:
    #- cd /usr/local/${CI_PROJECT_NAME}/src/${CI_PROJECT_NAME}
    - eval $(ssh-agent -s)
    - echo "$SSH_PRIVATE_KEY" | tr -d '\r' | ssh-add -
    ## Create the SSH directory and give it the right permissions
    - mkdir -p ~/.ssh
    - chmod 700 ~/.ssh
    - ssh-keyscan ${DEPLOY_HOST} > ~/.ssh/known_hosts
    - chmod 644 ~/.ssh/known_hosts
--完--
- 原文作者: 留白
- 原文链接: https://zfunnily.github.io/2022/06/cicd/
- 更新时间:2024-04-16 01:01:05
- 本文声明:转载请标记原文作者及链接
