分类 编程 中的文章

shader初尝试 | 给石头覆盖一层雪景(Hello World)

给石头覆盖一层雪景

资源准备

在Unity中创建一个项目,导入石头模型,下面就开始利用shader给石头做一个雪景覆盖.

实现效果

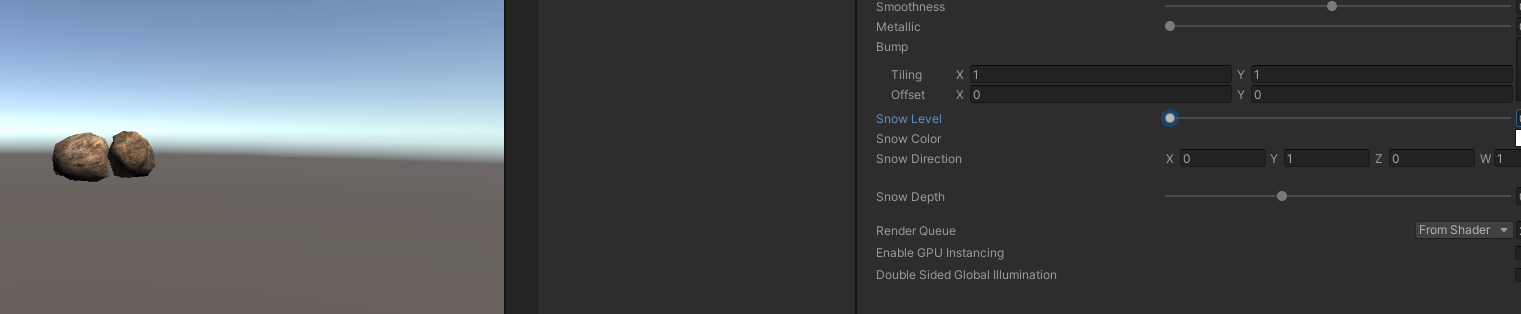
未覆盖雪景的样子
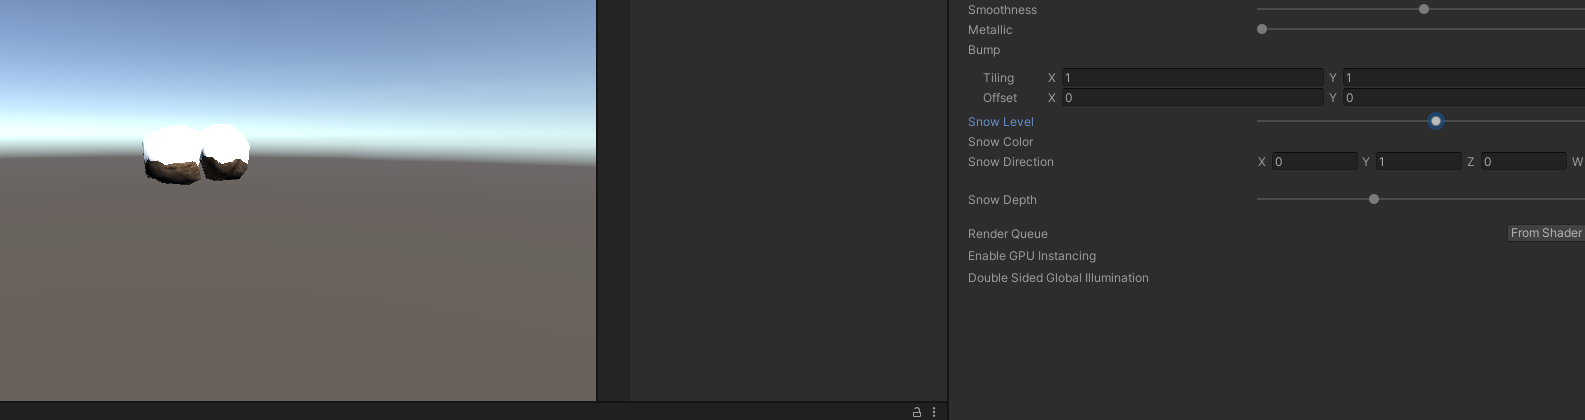
覆盖了雪景的样子
开始代码

我在代码中标注了1,2,3,4,5

代码
// Upgrade NOTE: replaced '_Object2World' with 'unity_ObjectToWorld'

Shader "Custom/Diffuse Texture"
{
    Properties
    {
        _Color ("Color", Color) = (1,1,1,1)
        _MainTex ("Albedo (RGB)", 2D) = "white" {}
        _Glossiness ("Smoothness", Range(0,1)) = 0.5
        _Metallic ("Metallic", Range(0,1)) = 0.0

        //1
        _Bump("Bump", 2D) = "bump" {}
        _Snow ("Snow Level", Range(0, 1)) = 0.1
        _SnowColor ("Snow Color", Color) = (1.0, 1.0, 1.0, 1.0)
        _SnowDirection ("Snow Direction", Vector) = (0, 1, 0)
        _SnowDepth ("Snow Depth", Range(0, 0.3)) = 0.1
    }
    SubShader
    {
        Tags { "RenderType"="Opaque" }
        LOD 200

        CGPROGRAM
        // Physically based Standard lighting model, and enable shadows on all light types
        #pragma surface surf CustomDiffuse vertex:vert

        // Use shader model 3.0 target, to get nicer looking lighting
        #pragma target 3.0

        sampler2D _MainTex;

        //2
        sampler2D _Bump;
        float _Snow;
        float4 _SnowColor;
        float4 _SnowDirection;
        float _SnowDepth;

        struct Input
        {
            float2 uv_MainTex;

            //3
            float2 uv_Bump;
            float3 worldNormal; INTERNAL_DATA
        };

        half _Glossiness;
        half _Metallic;
        fixed4 _Color;

        // Add instancing support for this shader. You need to check 'Enable Instancing' on materials that use the shader.
        // See https://docs.unity3d.com/Manual/GPUInstancing.html for more information about instancing.
        // #pragma instancing_options assumeuniformscaling
        UNITY_INSTANCING_BUFFER_START(Props)
            // put more per-instance properties here
        UNITY_INSTANCING_BUFFER_END(Props)

        void surf (Input IN, inout SurfaceOutput o)
        {
            // Albedo comes from a texture tinted by color
            fixed4 c = tex2D (_MainTex, IN.uv_MainTex) * _Color;
            //4
            o.Normal = UnpackNormal(tex2D(_Bump, IN.uv_Bump));
            if (dot(WorldNormalVector(IN, o.Normal), _SnowDirection.xyz) > lerp(1, -1, _Snow))
            {
                o.Albedo = _SnowColor.rgb;
            }
            else
            {
                o.Albedo = c.rgb;
            }

            o.Alpha = c.a;
        }

        inline float4 LightingCustomDiffuse (SurfaceOutput s, fixed3 lightDir, fixed atten)
        {
            float difLight = dot(s.Normal, lightDir);
            float hLambert = difLight * 0.5 + 0.5;

            float4 col;
            col.rgb = s.Albedo * _LightColor0.rgb * (difLight * atten * 2);
            col.a = s.Alpha;
            return col;
        }

        //5
        void vert(inout appdata_full v)
        {
            float4 sn = mul(transpose(unity_ObjectToWorld), _SnowDirection);
            if (dot(v.normal, sn.xyz) >= lerp(1, -1, (_Snow * 2)/ 3))
            {
                v.vertex.xyz += (sn.xyz + v.normal) * _SnowDepth * _Snow;
            }
        }
        ENDCG
    }
    FallBack "Diffuse"
}

  1. 声明并加入一个显示名称为Bump的贴图,用于放置法线图

    ……

    阅读全文

shader初尝试 | 给石头覆盖一层雪景(Hello World)

给石头覆盖一层雪景

资源准备

在Unity中创建一个项目,导入石头模型,下面就开始利用shader给石头做一个雪景覆盖.

实现效果

未覆盖雪景的样子

覆盖了雪景的样子

开始代码

我在代码中标注了1,2,3,4,5

代码
// Upgrade NOTE: replaced '_Object2World' with 'unity_ObjectToWorld'

Shader "Custom/Diffuse Texture"
{
    Properties
    {
        _Color ("Color", Color) = (1,1,1,1)
        _MainTex ("Albedo (RGB)", 2D) = "white" {}
        _Glossiness ("Smoothness", Range(0,1)) = 0.5
        _Metallic ("Metallic", Range(0,1)) = 0.0

        //1
        _Bump("Bump", 2D) = "bump" {}
        _Snow ("Snow Level", Range(0, 1)) = 0.1
        _SnowColor ("Snow Color", Color) = (1.0, 1.0, 1.0, 1.0)
        _SnowDirection ("Snow Direction", Vector) = (0, 1, 0)
        _SnowDepth ("Snow Depth", Range(0, 0.3)) = 0.1
    }
    SubShader
    {
        Tags { "RenderType"="Opaque" }
        LOD 200

        CGPROGRAM
        // Physically based Standard lighting model, and enable shadows on all light types
        #pragma surface surf CustomDiffuse vertex:vert

        // Use shader model 3.0 target, to get nicer looking lighting
        #pragma target 3.0

        sampler2D _MainTex;

        //2
        sampler2D _Bump;
        float _Snow;
        float4 _SnowColor;
        float4 _SnowDirection;
        float _SnowDepth;

        struct Input
        {
            float2 uv_MainTex;

            //3
            float2 uv_Bump;
            float3 worldNormal; INTERNAL_DATA
        };

        half _Glossiness;
        half _Metallic;
        fixed4 _Color;

        // Add instancing support for this shader. You need to check 'Enable Instancing' on materials that use the shader.
        // See https://docs.unity3d.com/Manual/GPUInstancing.html for more information about instancing.
        // #pragma instancing_options assumeuniformscaling
        UNITY_INSTANCING_BUFFER_START(Props)
            // put more per-instance properties here
        UNITY_INSTANCING_BUFFER_END(Props)

        void surf (Input IN, inout SurfaceOutput o)
        {
            // Albedo comes from a texture tinted by color
            fixed4 c = tex2D (_MainTex, IN.uv_MainTex) * _Color;
            //4
            o.Normal = UnpackNormal(tex2D(_Bump, IN.uv_Bump));
            if (dot(WorldNormalVector(IN, o.Normal), _SnowDirection.xyz) > lerp(1, -1, _Snow))
            {
                o.Albedo = _SnowColor.rgb;
            }
            else
            {
                o.Albedo = c.rgb;
            }

            o.Alpha = c.a;
        }

        inline float4 LightingCustomDiffuse (SurfaceOutput s, fixed3 lightDir, fixed atten)
        {
            float difLight = dot(s.Normal, lightDir);
            float hLambert = difLight * 0.5 + 0.5;

            float4 col;
            col.rgb = s.Albedo * _LightColor0.rgb * (difLight * atten * 2);
            col.a = s.Alpha;
            return col;
        }

        //5
        void vert(inout appdata_full v)
        {
            float4 sn = mul(transpose(unity_ObjectToWorld), _SnowDirection);
            if (dot(v.normal, sn.xyz) >= lerp(1, -1, (_Snow * 2)/ 3))
            {
                v.vertex.xyz += (sn.xyz + v.normal) * _SnowDepth * _Snow;
            }
        }
        ENDCG
    }
    FallBack "Diffuse"
}

  1. 声明并加入一个显示名称为Bump的贴图,用于放置法线图

    ……

    阅读全文

UnityShader基本概念

何为shader

shader中文翻译为着色器,其实是一种用来渲染图形的技术,我们可以通过shader编程,来自定义显卡渲染画面的算法,显示我们所期望的结果。

shader种类

  • 顶点着色器: 处理每个顶点,将顶点的空间位置投影在屏幕上,即计算顶点的二维坐标。同时,它也负责顶点的深度缓冲(Z-Buffer)的计算。顶点着色器可以掌控顶点的位置、颜色和纹理坐标等属性,但无法生成新的顶点。顶点着色器的输出传递到流水线的下一步。如果有之后定义了几何着色器,则几何着色器会处理顶点着色器的输出数据,否则,光栅化器继续流水线任务。

    ……

    阅读全文

UnityShader基本概念

何为shader

shader中文翻译为着色器,其实是一种用来渲染图形的技术,我们可以通过shader编程,来自定义显卡渲染画面的算法,显示我们所期望的结果。

shader种类

  • 顶点着色器: 处理每个顶点,将顶点的空间位置投影在屏幕上,即计算顶点的二维坐标。同时,它也负责顶点的深度缓冲(Z-Buffer)的计算。顶点着色器可以掌控顶点的位置、颜色和纹理坐标等属性,但无法生成新的顶点。顶点着色器的输出传递到流水线的下一步。如果有之后定义了几何着色器,则几何着色器会处理顶点着色器的输出数据,否则,光栅化器继续流水线任务。

    ……

    阅读全文

抽卡逻辑自述

抽卡逻辑自述

参考《剑与远征》

卡牌颜色以及合成

颜色合成
绿色可分解,得到粉尘和银瓜子, 最基础的卡
蓝+同样的三张蓝色可合成一张蓝+
同种族的三张蓝+可以合成一张紫(可以选择合成其中蓝+的某个紫色)
紫+同英雄的两张紫色可以合成一张紫+
同种族的三张紫+可以合成一张黄(可选择合成其中紫+的某个角色)
黄+黄与同角色的紫+可以合成黄+
同种族的两张黄+可以合成一张红(可以选择合成其中黄+的某个角色)
红+同种族的红与黄+结合可以合成红+
红+与两张同英雄的紫+可以合成一张白
一张白与同英雄的紫+可以升星, 共5星

简单来说:

……

阅读全文

抽卡逻辑自述

抽卡逻辑自述

参考《剑与远征》

卡牌颜色以及合成

颜色合成
绿色可分解,得到粉尘和银瓜子, 最基础的卡
蓝+同样的三张蓝色可合成一张蓝+
同种族的三张蓝+可以合成一张紫(可以选择合成其中蓝+的某个紫色)
紫+同英雄的两张紫色可以合成一张紫+
同种族的三张紫+可以合成一张黄(可选择合成其中紫+的某个角色)
黄+黄与同角色的紫+可以合成黄+
同种族的两张黄+可以合成一张红(可以选择合成其中黄+的某个角色)
红+同种族的红与黄+结合可以合成红+
红+与两张同英雄的紫+可以合成一张白
一张白与同英雄的紫+可以升星, 共5星

简单来说:

……

阅读全文

层级时间轮 | skynet 定时器

skynet定时器

要解析一个程序代码,先了解数据结构,这是基础,再看函数。 拿skynet定时器举例子。

数据结构

//定时器事件 用于抛出定时器事件到消息队列里。理解这个数据结构需要先了解skynet的框架原理,
//不理解这个数据结构也不影响下面的论述
struct timer_event {
	int32_t handle;
	int session;
};

//定时器节点
struct timer_node {
	struct timer_node *next;
	uint32_t expire;
};

//定时器链表
struct link_list {
	struct timer_node head;
	struct timer_node *tail;
};

//层级时间轮
//存放所有定时器的地方
struct timer {
	struct link_list near[TIME_NEAR]; //最近的定时器
	struct link_list t[4][TIME_LEVEL];//更久远的定时器
	struct spinlock lock;           //全局锁
	uint32_t time;                  //当前滴答数
	uint32_t starttime;             //程序开始时间 绝对时间 时间戳,单位 s 秒
	uint64_t current;               //当前时间 相对时间 1cs 厘秒 =  10ms 毫秒
	uint64_t current_point;         //系统(pc)运行时间 相对时间 单位: cs 厘秒
};

上面定时器的基本数据结构了解了,再来看下面的函数, 基本思路是一样的。

……

阅读全文

层级时间轮 | skynet 定时器

skynet定时器

要解析一个程序代码,先了解数据结构,这是基础,再看函数。 拿skynet定时器举例子。

数据结构

//定时器事件 用于抛出定时器事件到消息队列里。理解这个数据结构需要先了解skynet的框架原理,
//不理解这个数据结构也不影响下面的论述
struct timer_event {
	int32_t handle;
	int session;
};

//定时器节点
struct timer_node {
	struct timer_node *next;
	uint32_t expire;
};

//定时器链表
struct link_list {
	struct timer_node head;
	struct timer_node *tail;
};

//层级时间轮
//存放所有定时器的地方
struct timer {
	struct link_list near[TIME_NEAR]; //最近的定时器
	struct link_list t[4][TIME_LEVEL];//更久远的定时器
	struct spinlock lock;           //全局锁
	uint32_t time;                  //当前滴答数
	uint32_t starttime;             //程序开始时间 绝对时间 时间戳,单位 s 秒
	uint64_t current;               //当前时间 相对时间 1cs 厘秒 =  10ms 毫秒
	uint64_t current_point;         //系统(pc)运行时间 相对时间 单位: cs 厘秒
};

上面定时器的基本数据结构了解了,再来看下面的函数, 基本思路是一样的。

……

阅读全文

利用时间轮实现定时器

理解定时器

适用场景

  1. 定时任务(每隔1s钟打印一次数据)
  2. 超时控制(xx分钟没有动作就断开连接)
  3. 频率限制(最快只能每5s调用一次API)

定时器常用的数据结构有如下几种:

  • 链表
  • 双向有序链表
  • 最小堆
  • 时间轮
  • 层级时间轮

链表

链表用于存储所有的定时器。每次都需要遍历链表,从里面找出过期的任务,简单粗暴不采用。

……

阅读全文

利用时间轮实现定时器

理解定时器

适用场景

  1. 定时任务(每隔1s钟打印一次数据)
  2. 超时控制(xx分钟没有动作就断开连接)
  3. 频率限制(最快只能每5s调用一次API)

定时器常用的数据结构有如下几种:

  • 链表
  • 双向有序链表
  • 最小堆
  • 时间轮
  • 层级时间轮

链表

链表用于存储所有的定时器。每次都需要遍历链表,从里面找出过期的任务,简单粗暴不采用。

……

阅读全文